Introduction to Docker (build -> ship -> run)

Why should we use Docker:
- Many containers can be placed in a single host
- Flexible resource sharing
- Server agnostic
- Ease of moving and maintaining your applications
Authentication: After you login to dockerhub using the CLI, docker will store an authentication key in the config.json file on your local machine. You can access this file. If you are using a mac, the authentication is stored in a keychain.
cat .docker/config.jsonContainer: A container is a process running on host. We call each container a “service.” It is the running version of the image. A container is also known as a “namespace.” A container cannot see the rest of the server so it cannot contaminate the rest of the server. Each container will have its own filesystem (only containing the files specified by the image), IP address, virtual network interface card (vNIC: configuration to connect to a network), and process list.
- Cross OS compatibility (as long as it’s running linux or windows)
- Application language agnostic
- Cross platform
- Immutable: You can’t change a container. You should redeploy a new container.
- Ephemeral: Containers are temporary
- Persistent Data: Unique data that must be used in the container (ie. database data). You can use either volumes or bind mounts. The preferred method is volumes.
- Volumes: Special location outside of the container’s file system to store data. Volumes can be backed up.
- Bind mount: A file located on the host machine is mounted into the container
Command Format:
Docker <command> <subcommand>Control Group (CGroup): Assign limits to server resources such as CPU, memory, or network). You can also specify the prioritization if resources are limited on your server. You can also execute commands for all processes in the control group.
Docker Engine: The Docker server.
Image: Instructions to build a container. It specifies the binaries, libraries, app code, and instructions to run the image. It does not include the operating system (the server provides the operating system) or kernel modules (drivers).
- Dockerhub: When pushing an image to dockerhub, each image has its own repository. You can add tags to differentiate versions in the repository.
- Layers: Every change to the image is a new layer
- Tags: Represents a specific image commit. Not a version. Not a branch.
<imageName>:<tagName>IP Table: Network routing and firewall.
Layers: An image contains multiple layers as shown below. Each layer has a unique SHA Hash.
4. Application //installed third
3. Flask //installed second
2. Python (library and binaries) //installed first
1. Debian (operating system)- Caching: Each layer is only stored once on the host. This saves storage space and improves transfer speed.
Linux Distributions: You will deploy your apps in containers running different Linux distributions depending on your needs. Here are the main distributions
- Alpine: Lightweight
- Debian: Heavier
Namespaces: A container is known as a “namespace.” A namespace cannot see the rest of the server so it cannot contaminate the rest of the server. Each namespace will have its own filesystem (only containing the files specified by the image), IP address, virtual network interface card (vNIC: configuration to connect to a network), and process list.
Network Address Translation (NAT): IP addresses identify each device connected to the internet. The number of devices accessing the internet far surpasses the number of IP addresses available. Routing all of these devices via one connection using Network Address Translation helps to consolidate multiple private IP addresses on one private network into one public IP address.
Network Address Translation is a way to map multiple local private addresses to a public one before transferring the information. Organizations that want multiple devices to employ a single IP address use NAT, as do most with home routers. For example, if someone uses the laptop to search for directions to their favorite restaurant. The laptop sends this request in a packet to the router, which passes it along to the web. But first, the router changes the outgoing IP address from a private local address to a public address. If the packet keeps a private address, the receiving server won’t know where to send the information back to. By using NAT, the information will make it back to the laptop using the router’s public address, not the laptop’s private one.

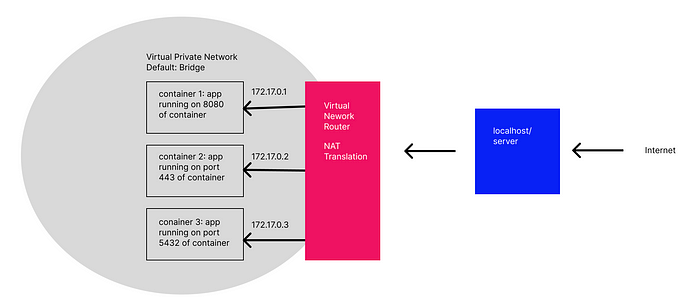
Networking: By default, Docker will create a virtual network (default virtual network is “Bridge”) with all the “attached” containers. Each container will have a private IP address created through network address translation (NAT). When we create a container, we instruct Docker to listen on a given port on the localhost (server) and forward all traffic from this port to a specific port on the container. For example, if we publish container 1 using --publish 8080:80, your localhost will forward all traffic from port 8080 to port 80 on container 1. Presumably, you have configured your app to run on port 80 in container 1. This arrangement provides a security layer so that you only have to expose port 80 on the server. Without this virtual network, each app would need to correspond to a port on the server.

- Bridge Network: The bridge network comes with a bridge driver creates a virtual network with a subnet with ip addresses 172.17.x.x. Of note, the bridge network does not have the DNS naming server.
- Bridge Driver: The default bridge network driver allow containers to communicate with each other when running on the same docker host.
- Compose: Spins up a new virtual network
- DNS Naming: Containers don’t rely on IP addresses to talk to each other because IP addresses can change. Instead, Docker uses the container name as the domain name for containers to talk to each other.
Open Container Initiative: Standards for registry, container, and image. https://opencontainers.org/
Registry: A repository for images. Using “docker push” you can push the image to a repository. Using “docker pull” you can pull the image from the repository.
Server Architecture: As containers are OS agnostic, the server can be running Linux or Windows. On top of your OS, Docker needs to be installed. Then, Docker can pull the image from the registry to run the container. Once the container is running, your app will be running.
Image
Docker
Linux Virtual Machine
Linux/Windows
Union Mount: Typically, when Docker mounts the filesystem, it is positioned in a different place in the computer’s memory so none of the mounts interfere with one another. A union mount organizes all the mounts so all of the files from each mount are accessible. This means that any of the programs, documents or anything else included in any of the mounts is open for users to see.
Writing a Dockerfile: Write a Dockerfile containing the following commands. Then run the Docker command “docker build.” Each code block (ie. FROM, ENV, RUN, etc) is a stanza. Each stanza is a layer in the image. When you build the dockerfile, Docker will assign each stanza a build hash. Therefore, the next time you build this dockerfile, docker will not rebuild this stanza if the stanza hasn’t changed. Docker will reference the build hash for those packages.
- Logging: Docker will handle logging. However, you need to link the logs from your app to “stdout” and “stderr” as shown below.
- EXPOSE: Ports exposed in the docker virtual network. Note, you still need to forward the traffic from the host to these ports.
- RUN: Each
RUNcommand in a Dockerfile creates a new layer to the Docker image. In general, each layer should try to do one job and the fewer layers in an image the easier it is compress. This is why you see all these ‘&& 's in theRUNcommand, so that all the shell commands will take place in a single layer.
FROM python //pulls the python image and linux image from the registry. the image contains python, binaries, and libraries
ENV KEY_1=VALUE1 \
    KEY_2=VALUE2
RUN pip install flask \
    && mkdir directory_name \
    && mkdir directory_name2
RUN ln -sf /dev/stdout /var/log/python/access.log \
    && ln -sf /dev/stderr /var/log/python/error.log
EXPOSE 80 443
WORKDIR /app
COPY ..
CMD ["python app.py", "echo", "Hello World"]
Running a container: You can run a docker image by simply pulling an image from a repository such as Dockerhub. You can run the command below to pull the most recent image of nginx (a web server) and run it in a container
docker container run --publish 80:80 --detach nginx- Look for nginx image in local image cache.
- If no image is found locally, pull nginx image from dockerhub. If no version is specified, it will pull the latest version
- “run” will create a new container from the image. The container will receive a virtual IP inside the private Docker network.
- “--publish 8080:80” routes traffic on port 8080 on the host to port 80 of the container. You can now access nginx by going to localhost:80. Browser =>localhost:80 => container:80 => app
- “--detach” will run the container in the background
Commands: Note, instead of using <ContainerID>, you could use the container name
docker container run --publish 80:80 nginx // download image, build container, run container
docker container top <containerID> //list processes in container
docker container ls //list all running containers               docker container ls --all //list all containers
docker container logs <containerID> //show logs in container
docker container stop <containerID> //stop running container
docker container rm <containerID> //remove a stopped container
docker container rm -f <containerID> //remove a running container
docker container start <containerID> //start container
docker container stop <containerID> //stop container
docker container inspect <containerID> //show container config
docker container stats <containerID> //show container stats
docker container exec --interactive --tty <containerID> <programName> //run a program inside the container. If you exit, the container will still be running.
docker container run --interactive --tty <containerID> <programName> //run a bash shell inside the container. If you exit, the container will stop.
docker network ls //show all networks
docker network inspect <networkName> //show network config
docker network create //create new virtual network
docker network connect //attach a network to a container
docker network disconnect //detach a network to a container
docker image pull <imageName>:<version> //download image from dockerhub
docker image push <imageName>:<version> //push image to dockerhub. if the image doesn't exist, it creates a new repository in dockerhub.
docker image history <imageName> //history of image layers
docker image inspect <imageName> //image metadata
docker image tag <sourceImageName> <targetImageName> //duplicates the image with a new name and tag. Note, the copy has the same image ID.
docker image build -t <tagName> . //build
docker image prune -a //remove all unused
docker login //login to dockerhub
docker volume ls //show volumes on local machine
docker ps //shows containers and images
Flags
--detach //run in background
--name //specify name of container
--publish //expose a port on the server to route traffic to the container.
--f //force
--env testKey=testValue //pass an environment variable into the container
--help //additional options for a command
--interactive //keep session open
--tty //open a shell in the container
--network //create a network and attach the container to it
-t //tag image
-f //reference file other than default file
-v $(pwd):<fileOrFolderPathOnHost>//mount a file to the container. $(pwd) is a shortcut for "print working directory"
Server Commands
ps aux | grep <query> //query for a process. you can look for a PID, name, etc
chown //change owner
pwd //print working directory=print path from root
cp <file name>//copy file or folder
mv <file name>//move file or folder
mkdir <folder name>/ //notice the trailing backslash
touch <new file name> //creates a new file
touch -m <file name> //edit when the file was accessed
ls -l //lists all the files and files with permissions
chmod <ugoa+-rwx>//u=user, g=group, o=others, a=all, +=add,-=remove, r=read, w=write, x=execute
apt install <package> //install package with apt package manager
cat <filename> //display text of file
ps //display process running in current shell
vim <file name> //terminal text editor
history //displays all the previous commands you executed
which <command> //displays path for a shell command
grep "<text query>" <file> //search a file for the given text query
wget <url> //fetch content from the internet
Docker Compose: Show relationships between containers. Default filename is docker-compose.yml (any name can be used). You can run all the docker shell commands in the docker compose file
- Docker-Compose Down: The docker-compose down command will delete the database which contains the data. Therefore, you should use volumes to persist the data.
- Build context: Specifies where the dockerfile is
services:  # containers. same as docker run
  servicename: # a friendly name. this is also DNS name inside network
    build:
      context: .
      dockerfile: # use dockerfile if no image cache exists.
    image: # docker will look for an image cache first:
    command: # Optional, replace the default CMD specified by the image
    environment: # Optional, same as -e in docker run
    volumes: # Optional, same as -v in docker run
  servicename2:

volumes: # Optional, same as docker volume create

networks: # Optional, same as docker network create
docker-compose up //set up volumes/networks and start containers
docker-compose down //remove volumes/networks and containers
docker-compose down -v //remove volumes/networks, containers, and volumesSummary:
- Create a Dockerfile
- Write instructions in Dockerfile
- Build Dockerfile to create image
- Run image to create container


